
Sunday, August 31, 2014
Friday, August 29, 2014
Friday's Fancy
Native Corn has Arrived!!!
Butter and Sugar ... My Favorite.

Wishing you a fun Labor Day Weekend!

Wednesday, August 27, 2014
From Nickel to Oil Rubbed Bronze
A few years ago, my husband and I updated our downstairs bathroom. It had the classic 80's laminated vanity and a toilet and sink in a color called raspberry purée (I kid you not). I wish I had a picture to show you, but this was way before my blogging days, the color would have amazed you. I heard they discontinued it, I wonder why? Heh Heh. Since we only needed to update the toilet and vanity, we did this project ourselves. OMG what a difference it made!
We picked out a new faucet, changed the paint color of the walls and I made a decorative ladder.... See the tutorial here. Since then I have been updating the decor bit by bit.

When we updated the vanity faucet we went from nickel hardware to oil rubbed bronze hardware. The last piece to make the change was the toilet paper holder. It was nickel, but I loved the style. I hunted around but could not find a similar one in oil rubbed bronze. Then strolling through Home Depot (becoming my second home) I checked out the spray paint section, figuring maybe I could paint the toilet paper holder. I came upon Rust-oleum. They have this Metallic line of spray paint, a paint and primer all-in-one. So the oil rubbed bronze was coming home with me.
First you need to finely sand the surface, then wash in soapy water and let dry.

I fasted it to a piece of cardboard to make it easy to paint.

After apply 2 light coats, it looked fantastic.
I let it dry for 24 hours and then fastened it back to the wall. I love it, the paint covered great and it was so easy.


Yeah! Our bathroom finally looks completed!

Monday, August 25, 2014
No Better Way to Spend the Day...
Hi-ya! Hope you had a great weekend. We had fantastic weather here in NE, so the Hubby and I had some fun on Saturday and on Sunday I was able to get some creative projects started, some finished, and some future projects planned.
Saturday, Hubby and I went to the Madison Historical Society Antiques Fair. There were about 70 dealers. There were many items of great history, some unique, eclectic, and strange. The prices were definitely not flea market but more retail, dispite that, we had a great time walking around and browsing.
As luck would have it, I did find one item that had to come home with me.

Yep, old fashioned clothespins. Do you remember using this style to make reindeers at Christmas, I do. Previously I bought an old washboard (read about it here). I am in the processes of re-decorating my upstairs bathroom and planning to use some old fashioned laundry items. So I have been collecting items along my travels.
I still have shelving to stain, hardware to put together, and then add the finishing touch, my found treasures.
Final reveal to come soon, stay tuned.

Friday, August 22, 2014
Friday's Fancy
I saw this and it made me laugh as I thought of my sliding glass door my Otis likes to look out.

Have a great weekend!
Wednesday, August 20, 2014
Placemat Transformation...

I love to decorate for the different holidays. It adds a little festiveness to our home. One of the easiest ways to bring some holiday spirit into a room is by adding a decorative pillow. But they can be very expensive. Then I found these great DIY tutorials on turning a placemat into a pillow. How awesome is this. I can get my decorative holiday pillow at a fraction of the cost. Best part is you can get them after the holiday on clearance and save them for next year.
Here is how I did mine.
What you will need:
- Placemat (that has two layers of fabric sewn together)
- Seam ripper
- Stuffing
- Needle and thread or fabric glue
Directions:
Start with your placemat.

Take your seam ripper and rip the seam out of the bottom of the placemat just large enough to fit your hand through.

Then start stuffing and stuff again!!! Make sure to push the stuffing into the corners to fill them out… put in enough to make it puffy, but not too much that the seams are stretched.

Once you are done stuffing sew up the opening (or you can use fabric glue). I chose to hand sew it closed. Ta-da you are done!!! (See easy as pie!)

Now, I think I'll make a few more and come September I will be all tricked out for the fall!
What touches do you add to your home for the holiday?
Happy Hump Day!
Monday, August 18, 2014
Hi All!
I am obsessed with Pinterest! It is a plethora of good ideas, delicious recipes, and creative crafts. I just love researching projects and clever ideas to update my home.
Have you ever looked around a room or the front of your house and said to yourself "this could use a little umph". We'll here are a few of my favorite pins of simple home updates with great impact.
From Carpet to Wood Stairs
 |
| source |
Quick & Easy DIY Garage Door Upgrade
 |
| source |
Updating Your Vent Cover with Spray Paint
 |
| source |
DIY Decorative Wood ladder
 |
| source |
Air Return Grille
 |
| source |
DIY Faux Wood Garage Door
 |
| source |
Here's to finding a little inspiration!
Friday, August 15, 2014

Wednesday, August 13, 2014
DIY Faux Grain Sack Pillows
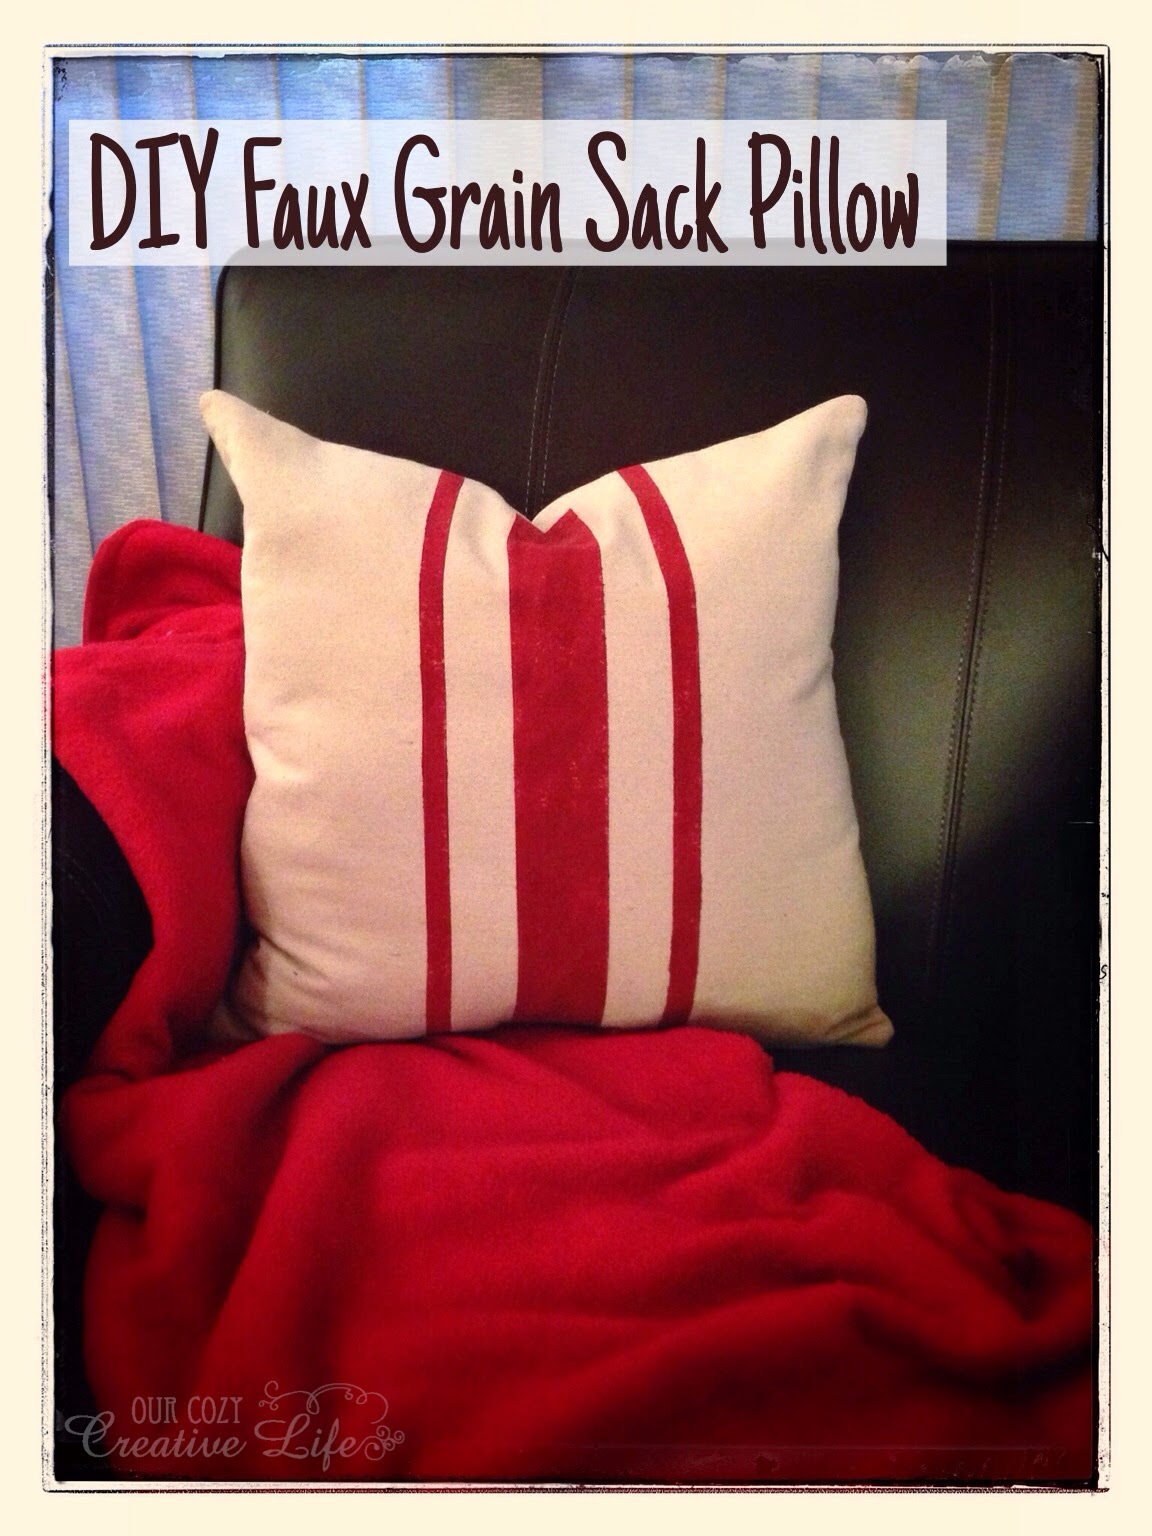
I love the look of grain sack pillows. I have looked high and low, but they could be rather expensive. Hubby and I are saving to buy a house so I am doing my best to stay within a budget (not always easy). Imagine my delight when I came across some ways to create faux grain sacks. Most were surprisingly easy, some were no sew and others required minimal sewing techniques.
Here is my take on making an easy sew faux grain sack pillow. And if I can do this, so can you. If you could ask my mom if I have a lot of sewing experience she would tell you that growing up I was the queen of the safety pin. I avoided sewing like the plague.
I purchased a painters drop cloth from my local Home Depot. It has that canvas look to it. The size I purchased was 4 ft x 15 ft. There are others sizes to choose from.
I first washed and dried the drop cloth; this makes it much softer and easier to work with (just avoid the fabric softener, it can hinder the application of the paint). I folded the drop cloth so I can cut 2 panels at one time. I cut a 19" x 38" then cut that in half to 19" x 19". I plan to make an 18" pillow so I cut the material at 19" (this leaves a 1/2" for sewing).

I ironed the fabric to take out all the wrinkles.
Using Frog Tape I taped off where I would like the stripes. Since my pillow was large I did a 2" center stripe and 1/2"on each side.
Using a dry brush I stippled the fabric paint on the drop cloth (I mixed red with a little black to get a barn red color). Remember to put either wax paper or cardboard under the cloth just in case the paint bleeds through. Before the paint completely dried I removed the Frog Tape.

Once dry place the painted side down on top of the other cut piece.
Pin the 2 together.
Sew along the edge, leaving an open area for stuffing.
Cut the corners so when you turn right side out your corners are crisp.

We are almost done. Now turn your pillow right side out. Stuff pillow. Use straight pins to hold together.
Hand stitch.

Here is the finished pillow nestled with a blanket.

I hope you've enjoyed this tutorial and thanks for stopping by!
Sharing with:
Monday, August 11, 2014
Strolling Around a Craft Fair
Hi All! We were blessed with some great weather this weekend so the Hubby and I went to a few local craft fairs. I love checking out any kind of fair. You never know what you may find. The ideas that some people have are awe inspiring.
Our first fair was in Clinton, CT. The Clinton Summer Fair at the First Church of Christ. Celebrating its 61st year. This is a great little fair offering handmade items, a silent auction, white elephant tent and a live auction. They also have great food vendors. Though I did not purchase anything here, the Hubby and I had a great time walking around and enjoyed a fresh donut and lemonade.
Next we went to the Guilford Lions Craft Fair Festival on the scenic Guilford Town Green. An annual event for 17 years. There were crafters from all forms of crafts including woodwork, jewelry, glass, paintings, photography, weaving, etc. Exhibitor booths are arranged along the paved walkways under the shade trees on the east half of the Green. The town green is also ringed by stores, restaurants, galleries, shops, churches, etc.
This is where I found my gem. I spotted it from across the pathway. The booth was home to an old man, who reminded me of my late Grandpa, selling hand crafted wooden carts, wooden bird houses on poles, wooden pickup trucks, etc.
This is what came home with me ...

It was only $20.00. What steal and from a wonderful man with a cute smile.
In my excitement over the wheelbarrow I forgot to take some pictures of him and his booth.
Happy Monday!

Friday, August 8, 2014
Friday's Fancy
Day-lilies
Indestructible Beauty... Natures Perfect Perennial


Have a Beautiful Weekend!
Wednesday, August 6, 2014
Deals and Steals
If you haven't heard of Decor Steals you are in for a treat.

Decor Steals is an awesome daily deal site where a daily steal is sent to your inbox every morning at 10 am eastern time. They also have an "extended steals" section, where they bring back some of the top sellers. All of their incredible pieces will help you save money so you can stretch those decorating dollars further. Items they offer can include: unique industrial and farmhouse accessories, Vintage Chic mirrors, French Cottage items, lighting for all rooms, and more! The people at Decor Steals strives to bring you the coolest products at a fraction of the cost.
Everyday at 10 am, I feel like a kid at Christmas, when I check my email to see what the daily deal is!
This this is my first purchase from them.
Farmhouse Barn | Large Hanging Rustic Metal Door Bucket
Now my biggest dilemma is how I am going to use it in my home. Stay tuned and see.
I was not compensated for this post. I just wanted to share with you an insider decorated site.
Monday, August 4, 2014
Panzanella... A Great Summer Salad
What is Panzanella you may ask... it is a Tuscan salad of bread and tomatoes. I imagine it was originally created because Italian cooks are known to not waste a single clove of garlic
or a sprig of parsley, Panzanella Salad is a great way to utilize stale
bread and ripe garden tomatoes.
My suggestion, make Panzanella soon!
With all the tomatoes and basil around, it’s definitely a summertime dish!
Start with some ripe tomatoes, a cucumber, red onion, crusty bread, olive oil, and vinegar.

Just cut the tomatoes into wedges…And throw them into a bowl.
Halve and seed the cucumber, then slice it up…And throw them into a bowl.
Slice a red onion thin…And throw them into a bowl.

Next, cube the stale bread... And throw in the bowl.
Whip up a quick vinaigrette: 1/4 cup olive oil, 1-2 tablespoon balsamic vinegar, salt and pepper. Whisk. (you can use a red wine vinegar if you prefer.)
Now drizzle the dressing over the top!

And Toss!

Now, this is the hard part: You must dig down deep and summon up the patience to wait at least an hour to eat. It will be tough. And you might hear it calling out to you. But the salad needs to bath a bit in order for the tomatoes to give off a their juices and the bread to soak up all the yummy goodness.
Note! The bread will not get soggy. Using a cabatta when stale — never gets soggy, it just gets moistened by the amazing dressing and the juices from the tomatoes.
Here is the easy to follow recipe:
Ingredients
• 1 loaf Very Crusty Bread (I used chabatta), best if it a day or two old*
• 1 whole Cucumber, Halved, Seeded And Sliced
• 4 whole Tomatoes, Cut Into Wedges
• 1/2 Red Onion, Sliced Thinly
• 1/4 cup Olive Oil
• 1-2 Tablespoon Balsamic Vinegar
• Salt And Pepper
• 4 whole Basil Leaves, Chiffonade (more To Taste)
• Olive Oil, For Drizzling if needed
Instructions
- Cut the stale bread into 1-inch cubes.
- In a large bowl, combine tomatoes, cucumber, onion, and bread.
- In a small jar, shake together the olive oil, vinegar, salt and pepper.
- Pour over the salad ingredients, tossing gently.
- Add basil and toss again.
- Cover and allow to sit at room temperature for an hour or two before serving.
- Sprinkle with more salt and pepper and serve.
* If you don't have stale bread, fear not, you can drizzle fresh bread (cubed) with olive oil, then bake in a slow oven (275º) till crispy (about 20-25 min)

Enjoy!
Sharing with:
Friday, August 1, 2014

Subscribe to:
Posts (Atom)